
okay...now onto our regularly scheduled post:
 here's a perfect ring to give to a friend, mother, daughter, wife, or yourself.
with a few and easy steps you can make this lovely little (okay kinda big) fabric flower ring for whoever you chose!
supplies:
*one strip of fabric measuring at 1 inch by 10 inches.
*one adjustable ring blank
*hot glue
i have kits for this ring in my shop yes that's right i'm making the move to big cartel.
paypal friendly, codes allowed for discounts, not nickle and diming me to death all made it easier for me to make the move. yes you will see my newer designs in my bc shop. i'll keep my etsy open...but assuming all goes well sooner than later all will be moved and only operating through V and Co. the shop .
 the kits come in three colors for now but if you are interested in another color just contact me either through email or through my "contact" in my shop and we'll see what i can do for you!
each kit comes with enough fabric and a ring blank. okay i digress.
ready to get started? here we go:
 first you will need to get your fabric cut to 1 inch by 10 inches. (it doesn't have to be perfect we're going for wonky)
 dab a little bit of hot glue at the end of your strip and fold in half. secure.
 dab another bit of hot glue and fold in half
 dab a little bit of hot glue to the end again...
 this time you are going to fold over like the picture above. (fold down instead of in half again)
 now you are going to twist your fabric a little
 and dab a little bit of hot glue to the "base"
 i like to make sure my fabric is twirled a little on the tighter side(but not too tight!). this will make your flower smaller and tighter.
 continue to twist and twirl your fabric all the while adding a dab of hot glue to secure your new twist to the last twist.
 when you get your flower as big as you want it (making sure you leave a little bit of a tail)
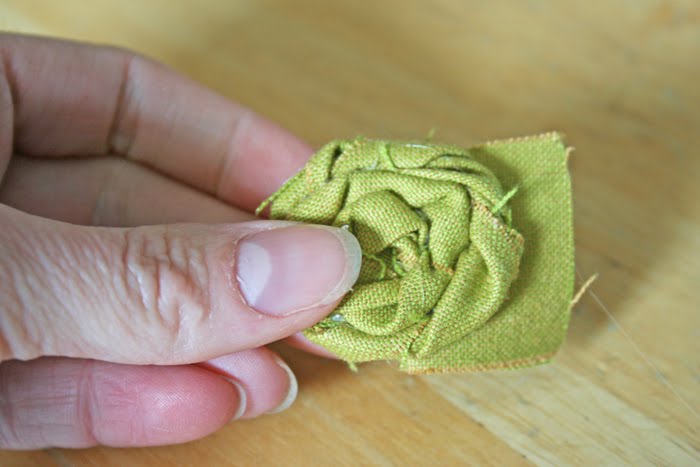 add some hot glue to the bottom of your flower and fold and secure your tail at the bottom of your flower flat.
 next cut off the extra tail that shows.
 next you will get your adjustable ring blank
 place a dab of hot glue on to it and
 secure your ring. let cool.
 what i love about these rings is that they are adjustable and comfortable so no matter how big or small your fingers are the ring base will work for you!
 now get ready to wear your new ring!
buy your kit here.
thanks for your support.
this week we have another guest blogger. (oh just wait what she has to show you!)
and i'll have another tutorial by me for the woman in your life having a brand new little one!
we'll talk soon!
;)
comments closed

32 comments:
WOW! This is such a fun tutorial I am so excited to try!
I love making your fabric bracelets and did a post on them few days ago. They are addictive! My toddler loves them too.
I have a feeling I will also love making this ring. The more colors the better :)
Thanks for sharing!
xoxo
cute!
Good Morning V.
So glad that you are feeling better.
The burnt toast was a cute touch!
Thank you for this wonderful tutorial. I have tried and tried to make those flowers and your pictures will really help me!
* I am having my give a way this morning, please drop by *
Sincerely ~ Trish
super cute V!! congrats on the big move... i'm so happy i did it!! and i'm glad you are feeling better!!
what a sweet little project! Wishing you much success with the new shop!
I'm glad you're feeling a little bit better. :)
Great tutorial!
So cute! I'll be giving it a try for sure.
I've made some fabric rings sort of like that but without ring blanks, just used elastic. Ring blanks would be MUCH better!
These have been floating around blogland, but yours is by far the cutest!!! Loving the Green color as well. I'm a sucker for anything green!
Glad you are feeling better.
That fabric ring is so precious. You could have one for every color.
Do you ever sleep or do you just lie in bed and think up your fabulous creations.
Enjoy you day...
CUTE!
smarty pants!
do you know what the ring blanks are made out of? fake metals turn my finger black :(
Simply wonderful!
chelsea the rings are platinum plated, nickel & lead free i hope this helps you on the info you needed!
This is so awesome! Thanks for the great tutorial!!
~Morgan
Meet Virginia!
Meet Virginia!
Meet Virginia!
Love the flower ring! I wanted to purchase one but you don't ship to Canada. So sad, I hope you will consider us Canadians in the future, we are just as convenient to ship to! =)
Jessika from Alberta
Super cute!
Ohhhhhhh, so pretty! Love it!
LOVE this! so cute!!!!
thanx for sharing!!!!
Love miranda
These are really cute and I love the corsage! Beautiful job!
Love this idea!! I found this tutorial through your flower brooch for Mother's Day post, which is also awesome! You're SO creative, it's amazing! Do you know if you can find the ring bases at craft stores like Michael's and Hobby Lobby?
This is so great! I am hosting Flower Week at my blog and would love for you to check it out.
http://singingthreelittlebirds.blogspot.com/2010/05/flower-week-begins-may-24th.html
This is terribly cute! I just bought some plain white onesies to start decorating...can't wait to try this!
I'm new to your blog and I feel like I've been missing out. My heart keeps skipping beats with every post I see! You're a genius and you may be my new favorite - soooo much to take in! Off to go settle down, feeling so excited!
Shauna
I love this..the colour of the fabric as well is a personal fave. This just looks really pretty.
What kind of material did you use for your rings? I love them! I love how they kind of unravel on the ends! You're so talented! Thanks!
I think this is a good idea to give this different but extraordinary fabric flower ring, I really think that is very useful and also it is a perfect ring to give.
Thanks for this beautiful tutorial and idea. I finally made two versions of it.
http://bombardone.com/sewingprincess/2010/09/lake-orta-romance-rings/
I made this last night!!! :) I will link you in when i write a post on it! :) it's so cute!
Thank you for the tutorial! I just knocked out 3 and my daughter and her friend loved them! I can't wait to hear what their friends think.
Adorable, will be a perfect mother & daughter activity this weekend!
Post a Comment