Showing posts with label baby girl gifts. Show all posts

Thursday, March 13, 2014

V and Co: What chocolate, a diet soda, and a good friend will get you

 Well first off isn't Liz awesome? She's even funnier in person. My "shipping department" is pretty cool, and she's also a great friend. She saw how stressed out I was and even may have seen some tears when I listed off all the things I had agreed to do. This month is pretty much insane, (for me at least) between flying home for a family wedding, and teaching, and speaking at quilt guilds (hi ladies! can't wait to talk!), and deadlines for undisclosed places, and then add other deadlines that just pop up because when you first said "yeah, I can do that." you had no idea how insane your month was going to be. Add all other life things...and well Liz took one look at me and said "I have chocolate and diet drink. And do you want me to blog something for you?" I stared at her and said "What would you write about?"
She said "Well, we'll see what I can come up with. And we'll give it a shot and then go from there?"
So, she wrote a fun little blog post. And she's a great voice for my blog. Perhaps we'll have her come back for another blog post! :)

 While she was blogging for me, I was able to piece, quilt,  and
 bind my large one block version of my...
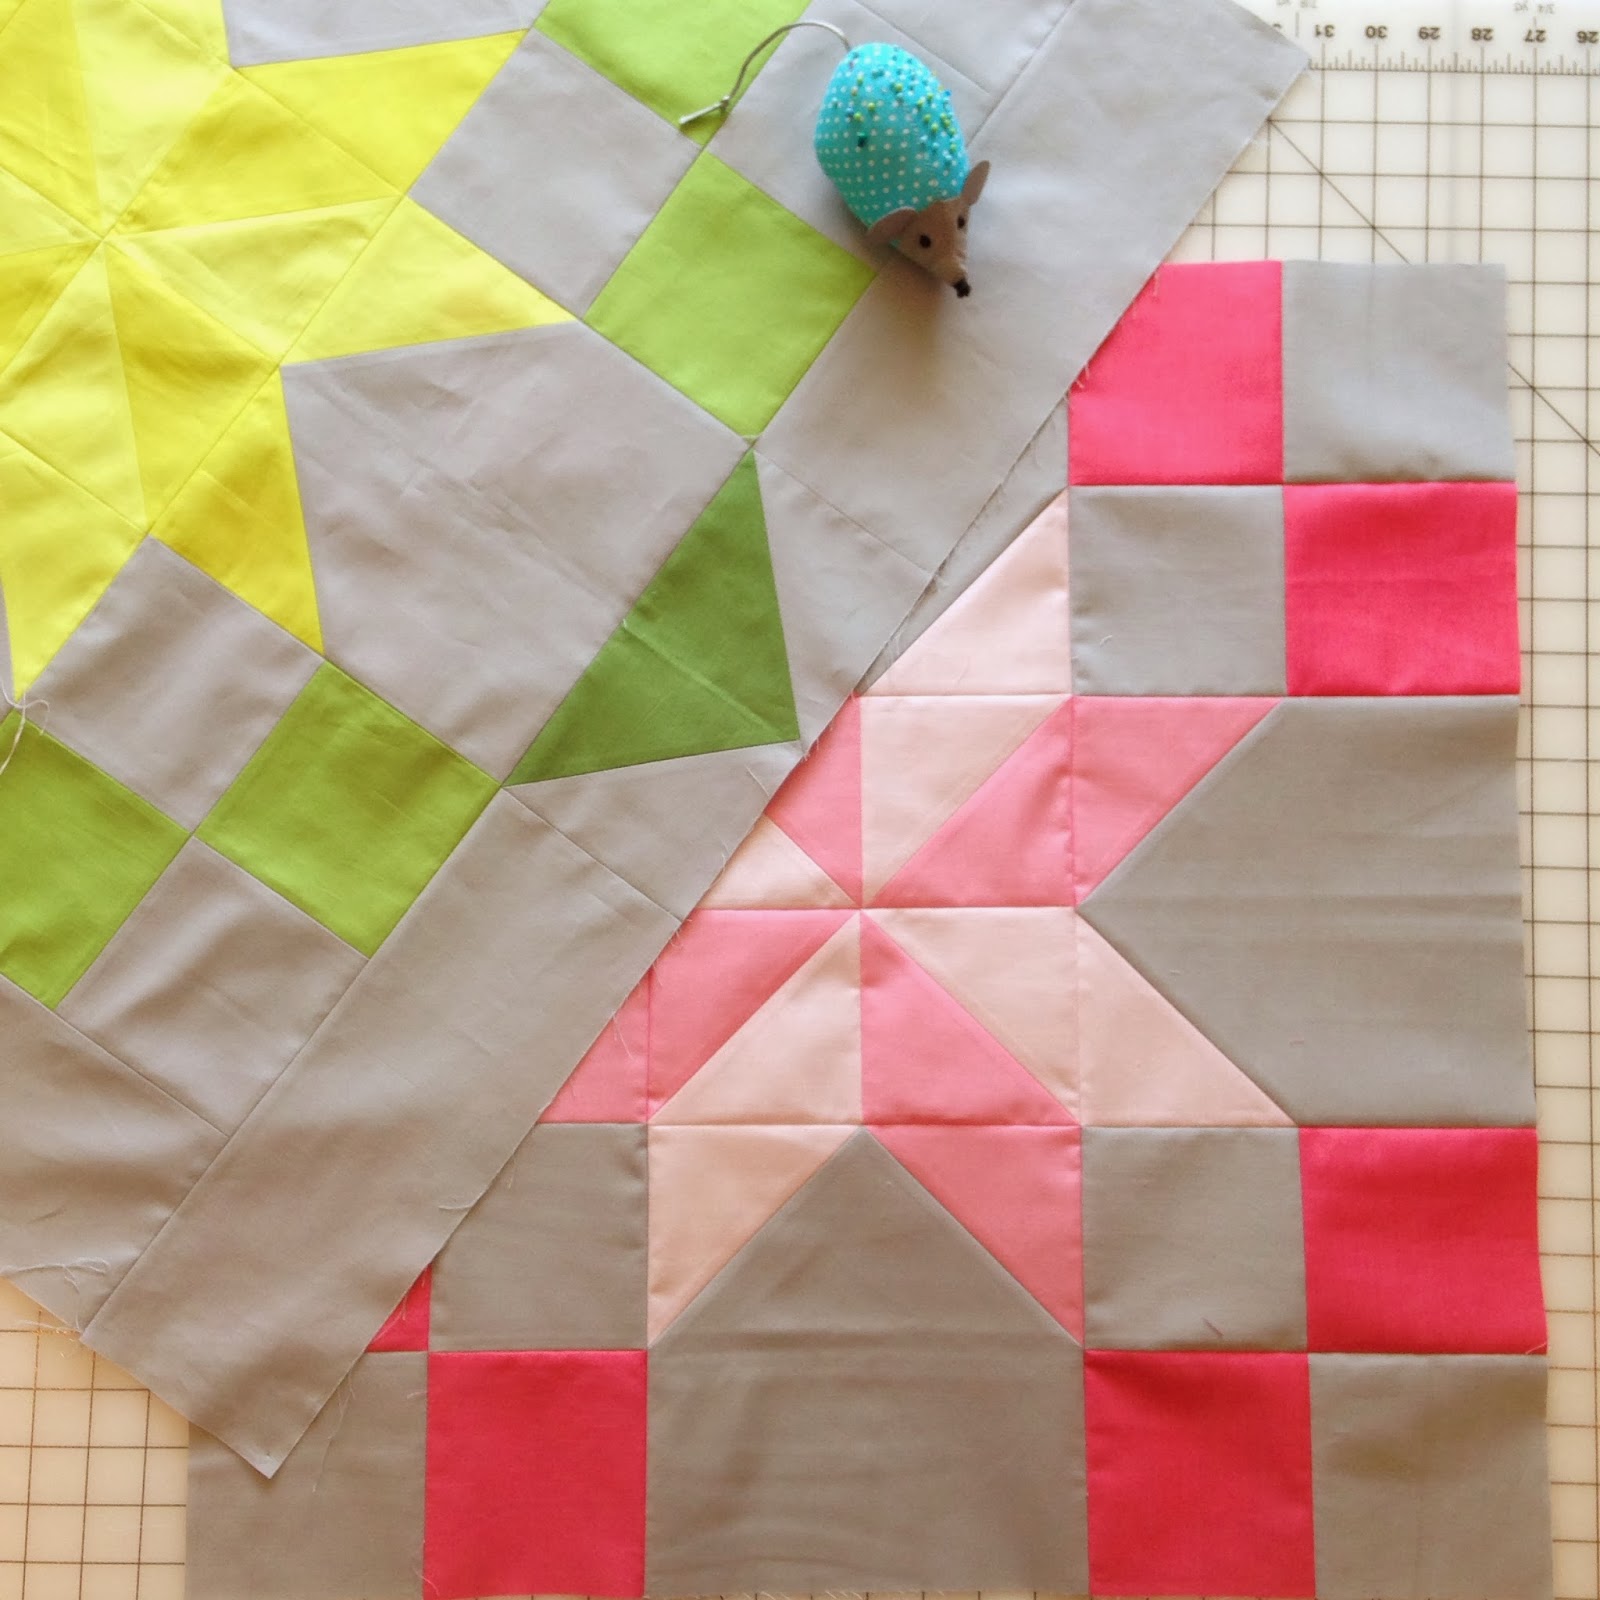
 kaleidoscope quilt. Which btw I'm also teaching this class at my local quilt store  today and tomorrow!

I used my Ombre stripe fabric (coming to a quilt store near you soon! seriously like in a day or so)
so far I've made this large block in lime and the pink... and I can't wait to make it in the other color ways as well. I'm super SUPER excited about this fabric coming out!
Baby quilt size 40"x40" instructions coming to a magazine near you soon.
The pink version is completely done...and well lets just say I love it.
This newborn quilt pattern will be in a magazine soon with instructions included. I'll most definitely keep you posted...and I'll ALSO keep you posted on when you can watch me on a quilt show website with a really great and awesome lady. See, I may be stressed but it's all wonderful stress. And wonderful opportunities. I love what I'm doing. I promise to come by and pop in and just do an update of sorts, make sure to write about my funny crazy when I'm not sewing stories as well...so that way I can look back and smile at my timeline of events and well, maybe use this spot as a "journal" of sorts...kind of like I used to.
Everything will be alright. Sometimes we just need a little bit of chocolate, a diet drink, and a great friend to tell you "It's okay." :)
Thanks for reading.
We'll talk soon. Promise. (okay, but I didn't pinky swear so it might be Liz or me, depending on how well the chocolate works with getting me through all the other promises I've made!)

follow V and Co on instagram and on Facebook

Wednesday, September 5, 2012

V and Co: how to: make an ombre ruffled flower onesie

nothing says girl like pink ruffles. so lets round out with what else...pink ruffles.
this one is one of my favorite ones. super easy, super texture-y and super cute. 

and then we talked about dying and appliquéing your doily on the onesie here.
so now lets talk about making ombre flowers for a onesie.

what you'll need:
-one onesie.
-4 strips of 11/2" by at least 10" of white jersey. (i got mine at joann's) but you can get some from amazon, or you can just take an old white t-shirt as well. 
-rit dye 
 to make your strips ombre:
-take one end and dip the strip 1/3 of the way in and then let 1/4 of the strip set inside the dye for about 5 minutes.
-flip it around and do it to the other side as well.

 to make your ruffles:
-place your machine to it's longest stitch (mine is #5)
-place the top thread by the spool in between your fingers, and give a little tension
on one side of your strip start sewing the running stitch as you hold the thread up above to give it tension, and watch your strip begin to ruffle.
 next take your ruffled strip and curl it into itself to create one flower.

i am holding the back of the flower this is what it should look like on the back, the one on the table is what it should look like on the front.

 next with a needle and thread, go through all layers of the bottom layer of the flower. make sure you do it a few time in different locations on the bottom so that it is secure.


now to attach the flowers onto the onesie.
there are a few ways to do this. the way i did it was to place a piece of cardboard inside the shirt, and place a few dabs of fabric glue on the back of each flower.
once i let it dry, i then went back and secured it with a few stitches in each flower onto the onesie.

but as you can see any there are a few gaps that get created whenever you move the onesie around, and i want it to look more like a corsage...so we:
 make a few stitches in between on the flowers so that when the baby moves around she wont lose the shape of the corsage.

and now you have the means of making some super cute onesies.
go at it!

Thursday, August 30, 2012

V and Co: how to: appliqué doilies onto a onesie


alrighty. so i heard from a few people, that lots of people are afraid of appliqué. is that true? this boggles me. it's not scary at all? but then again it's one of my favorite things because i can take it anywhere and work on it anytime. and i like the hand work.
but i get it it might be scary. so i'm going to talk a little today about appliquéing a doily onto your newly dyed onesie. and then in the near future we'll continue to talk about appliqué, because i think if you knew how to do it the easy way (no not with the raw edges though that would be find too) but with the right tools you to can do some great turn over looking appliqué. ah but i'm getting ahead of myself here. first lets just talk about this onesie at hand.

to make this onesie you will need:
doilies: now if you have heirloom ones and you wont be making anyone roll over in their grave or upset your great aunt maltilda by dyeing them or using them on something other than a decorative coaster...awesome.
if you need to buy some of your own: go here and joanns has a ton as well. i got mine at joanns (just make sure you buy the crochet doilies not the paper ones).

you can also just use doilies as is. like in my book:
where i make this simple yet elegant gathered border doily quilt. 
see you don't have to dye it...but it sure is kind of fun to do so. :)

okay so lets keep moving:
what you need:
-doilies.
-needle and aurifil or any thread to match your color of dye. (i used aurifil)
-embroidery scissors
-pins

and for more thin doilies (and my favorite wonder web  to use for appliqué):
Pellon Wonder-Web 807  <-- we'll show you how to use it next.


okay so first things first:
placement.
where do you want the doily? i wanted most of the doily to show on the front but because it was kind of big i wanted it off center. and i thought it would look cute going around to the back.
so from looking at the onesie from the front i liked the off centered look of the top picture...
so next i shifted the onesie on its side (with the hem facing me) and started to pin it in place. (now disclaimer: i am not using a stabilizer because we wont be sewing it on with a machine, it will be done by hand, if you do not feel comfortable skipping this then by all means place a stabilizer.)

make sure your doily is laying completely flat.
and start to pin the front side of your doily down making sure you only pin through the top layer of your onesies.


once you have a little over half of your doily set in place with the pins, shift the onesies so it is facing down, and make sure when you lay your onesie down flat there are no puckers or loose fabric under the doily.


take your threaded needle and bring the needle up through the jersey and the doily.
next take your needle and place it close the first stitch and go back through the doily and the jersey.
take small stitches first around the whole doily, then making an X through the middle. continue to stitch more X's until you feel like it is secured onto the onesie good enough.


okay now lets look at a thinner more delicate doily:
get your pellon and cut it out the shape of the doily. (it doesnt have to be perfect you just have to cover most of the doily so it won't sag where the stitches aren't placed)


next pin in place...
and flip your onesie so the backside is showing. (you may want to place a protective thin cloth under the onesies (so any of the webbing wont get on the ironing board) and a cloth under the iron-just in case) 
iron gently till the webbing has melted and adhere's the doily onto the front of the shirt (again the edges might not be perfectly kept down we just want to make sure that the doily stays put)

after you check that it indeed is secured in place repin just to make sure it doesn't travel or anything. 

and then repeat all the other steps we did with the doily.

and now you have two adorable looking one of a kind onesies.
next how to will be the ruffled ombre flower onesie...and then i have another fun thing we'll make with all the doilies i bought. :)

Tuesday, August 28, 2012

V and Co: how to: baby girl onesies: dyeing with rit dye


so last week i got to go to a baby shower (yes, by myself during the day while the kids were all in school...but i wasn't going to say that because i feel like i've rubbed that in your face enough and i kind of still want you to like me aside from the fact that i get up to like 7 hours of "opportunity to miss my children"every day. okay no really i'm done.)
it was a dual baby shower for moms that were having girls.

as i got ready to try to find something i wanted to give these two adorable new moms to be, i remembered in my frantic and sad attempt to place in haphazardly organized piles while trying to find something i REALLY needed in my yet to be fully unpacked storage area  in my first attempt to make my storage area fully organized i came across a few packages of onesies that i had stored away for such an occasion like this.

so i got out my dye and i got out my doilies and i started to have some fun.
but first lets briefly talk about dyeing.


i've mainly used Rit dye in the powder form.
for some of these onesies i also dyed doilies  for these onesies and doilies i used  Teal # 4  and Petal Pink  i've yet to try the fuchsia but i'm excited to...we'll see what i can make out of that.
in the near future i would like to try the liquid form of the dye, as i've never tried it and for this project i felt nervous to try something without giving it a trial run before, so if you have pointers by all means leave them in the comment section!

okay so lets talk about the dye and the prep.
first things first read the box and follow the directions on the box on how to mix your dye. and which method you are going to do. i always do the bucket method as i find i can control the saturation of the color or i can do different shades (i.e. ombre)

*prewash your garment or in my case for this project: garment and doily. this will help to take out anything in the garment or in the doily that will make your dye not take as well or unevenly. also it helps so that you don't get shrinkage after the fact.

*different saturations and hues for different fabrics.
this was very true for my doilies. i had some vintage doilies (mainly ivory) that grabbed the dye quickly and soaked in very dark.
the white joann's doilies grabbed the dye at a much brighter "hotter" color.
and the ivory doilies i had grabbed the dye at a less bright more muted yellow-ish tone. (it made my teal more greenish teal)

take into consideration if you are trying to get a close match in color and saturation, try to keep the fabric (or doilies) the same, and keep them in for the same amount of time.


after you play around with your doilies or onesies, rinse them out let them dry, if you dont feel the shade is dark enough, redo them to see if you can get a darker shade.

after you get the desired shade, wash with detergent in the washer. this will ensure that it will not bleed onto anything later on. if you are doing an ombre onesie (we'll talk about that next) i suggest you hand wash it first with something like Woolite so the color doesn't bleed into the white section before it sets.
one reader had this to suggest:
an artist friend told me to not rinse; air dry then heat set in a hot dryer with the item inside an old pillowcase, pinned closed. When you do wash, use cold water and mild detergent. It's worked well for our projects
okay now lets talk about different shades or ombre:


i did a whole tutorial on how to make the ombre onesie look here. 
in that tutorial i talk about making the dye really strong by not putting as much water as is directed on the box, the look you get is a much brighter and stronger look. this time i wanted to see what would happen if i just followed the box instruction and i wanted to do more of a softer blend up the onesie, and i wanted to make sure the top would stay completely white.
both end up giving you the ombre look.
this time what i did differently was:
*dipped the onesie only about halfway up once. the dye traveled up slightly but not as much (i think because the dye wasn't as strong)
*then i let the bottom sit in the dye for about 5 minutes.
*then i dipped the onesie 1/4 of the way down to create a middle shade
i did the same thing with this onesie in the teal color. and then i played around with the doily.
to create the ombre doily i did just like the onesie:
*i dipped halfway into the dye the doily (a wet doily)
*let the bottom of the doily sit in the dye for about 5 - 10 minutes.
*dipped about 1/4 of the way down the doily about 2 -3 times.
* las but not least after i've done all these steps i dipped quickly most of the doily except for the very top of the doily into the dye, and then set it aside to let it dry.

to set the color i did the same thing of letting it air dry, then hand washing in woolight  and then threw it in the dryer.
okay now, moving onto the next onesie. this one was again using the dye but this time we took strips of jersey fabric, folded them in half and then ombred them.
i briefly touched on this in the other ombre onesie tutorial. this time we did thicker flowers, and a few more of them to create a nice big flowery mess. :)
then after i played with the ombre and with dying the doilies, i just dyed one of the onesies a solid color and placed the non dyed white doilies on it. simple and cute.
so now that we've talked about how to dye your onesies and the accessories on them...next we're going to do the step by steps on how i attached the doilies and created the flowers and attached them onto the onesies.
that will be in our PART DUEX post. :)
so for now, go get your dye, play around with fabric dyeing and then we'll work on finishing up the cute factor by combining dye and adding the accessories.

ps if you have any questions or if you have insights please post them in the comment section i will interact with the questions there so if you have the same question as someone else maybe i've already answered it!
talk to you soon! :)

Friday, August 24, 2012

V and Co: making baby gifts


i've been busy making things baby gifts this week for a baby shower i was invited to. i made a few different kinds, this one is a simple ruffled ombre flower one.
and well, might as well show you how i made it and the other ones right? :)
so next week watch for how to's on baby onesies and a decor to go with it. i've had fun with it, and experimenting with the dye.
have a fantabulous weekend.
we'll talk soon.
Blog Widget by LinkWithin