
 so glad to see so many of you coming out of the woodwork to show your true colors on the addictive time waster apps and stupid facebook games. i'm not proud but i'm glad to say that my one time 10 hour obsession seems to be over. >;p
okay, today i'm guest posting this tutorial at U-CREATE. so welcome u-creaters who wandered on over here from kari's awesome site!
christmas is right around the corner and as much as i would love to say screw it to giving neighbor gifts, i know that isn't going to actually happen seeing that i have way too much of a fragile self esteem and i always want people to like me. i;m just sayin'. this tutorial is fast and easy and if you want your kids can help with parts of it too.
but i do have to tell you how this tutorial came about...the kids and i wanted to make snowflakes, you know out of paper like we used to make when i was young...well i forgot how to make them. seriously? i sat there and made square snowflake after stupid square snowflake, cursing that it was so simple when i was a kid and what was i doing wrong...for.heavens.sake. so i went and learned all over again how to make them. easy instructions here.
so we had a blast making a ton of snowflakes, and the mess of clippings that go with it. we had so much fun that i thought to myself...why not try to make fabric snowflakes, that we could keep to come out year after year. and well here you go, it was an experiment, that i'm kind of happy i tried. it may be a fun thing to try at your house too.
 Materials:
squares of thin white cotton fabric. (my squares featured here are 10" by 10" and 5" by 5")
craft bond adhesive spray.
long piece of fabric at the width and length you would like your table runner to be plus one inch to length and width (or length + 1" and width + 1") i used kona stone by robert kaufman.
 take your square and fold point to point like the picture above. with an iron press your seam.
 fold in half
press your seam with an iron.
 fold in half again. press your seams with the iron.
 and one more time. you will see there's a little tail left. and make sure you press it with the iron one last time.
 holding the top part firmly, cut off the tail. (see i wasn't getting the tail and hence why my first attempts with the paper snowflakes were square...not that there's anything wrong with square snowflakes...it's just that i wanted pretty round ones.)
next you are going to cut your pattern on the snow flakes. make sure you have a very firm grip on your triangle, other wise the fabric will slip around a little.
when making your snowflakes keep in mind that a rounded edge, makes roundy end edges, a pointy edge makes, well, pointy end edges. play around with it. see how many different kinds of snowflakes you can make!

if you are interested in a super cool book that i came across when trying to create paper snowflakes with the kiddos check out the Snowflakes for all Seasons
um try like 72 different kinds of snowflake patterns. we got to try the book because my neighbor actually owns it, and i've got to say, it was pretty sweet but some of those patterns made me get the sweats with how complicated they were...but i digress...onto the what we were talking about...the table runner.

now get your spay adhesive, and if you have a big sheet of paper or a towel you don't care about, place your snowflakes wrong side up on the paper or towel, and lightly spray one snowflake at a time.
place on the table runner where you would like your snowflake.
 i had some of my snowflakes come off the runner because i thought it would look cool if some of them were halfway on...
after the snowflakes dried on the runner i cut off the extra hanging pieces flush the edge of the runner.
 next to make the edge of the runner i did the simplest form of finishing my runner. you could make binding and that would be cute, but in this case this is what i did:
first fold your edge over 1/4" and press with an iron. then fold over again 1/4" and press with an iron. do this to each of the four edges of your runner.
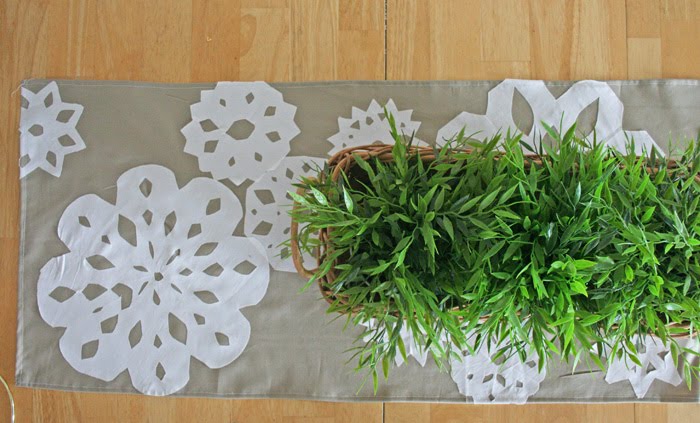
sew around your folded edge. you are done.
:) we'll talk soon. i'm hoping to not have any more children home sick with the flu...they are seriously cutting into my alone sewing time. and momma don't like that. not to mention that i'm so over the laundry too. and of course the sad little kids. but mainly i want my sewing time back.
have a fantabulous day.
comments closed
12 comments:
In art class when I was in the 5th grade we use to make snowflakes we were all amazed at folding and cutting could make something so pretty.
What an awesome idea! I would never have thought to use spray adhesive to adhere fabric. Do you know if it would hold up to washing?
Clever and it looks like it might be doable in an afternoon with NO interruptions, a pile of snowflakes and then a pile of gifts, thanks!
Super cute as always!
the glue says it's permanent, BUT i would suggest stitching around the edges if you know that it's going to be on a table that will have lots of kiddos dropping things on it!
Love this! Wonder if I will have time to make one before Christmas...?
This is so cute! I never made snowflakes as a kid but I have been wanting to try them with my daughter. Maybe we will make one of these!
Cute idea but way to nice for my neighborhood, so I might have to keep it!
I am posting a gift a day up until Dec 24th..so if you want some fun, funny and super easy last minute ideas...I got em! lol I love your blogs and am thrilled I found you here.
Cute idea, I forgot how to make snowflakes, thanks for the directions!
i love this idea! super cute end result!
peace. love. create.
victoria
http://gardenofedendesigns.blogspot.com/
That looks like it was so much fun to make! Thanks so much, I'll be linking.
cute! Very fun idea!
Post a Comment