Wednesday, April 28, 2010

guest blogger tutorial: tiffany of simply modern mom

okay first off thanks so much for the lovely response on the fabric flower ring (and kits). those babies are flying out the door and into the mail later on today. keep em coming and i'll keep up i promise.
now...today's guest blogger tutorial is from the lovely tiffany of simply modern mom. tiffany is one of those gals that you meet and you feel like you've known her for like ever. or at least that's how she makes you feel. shes genuine and nice. and that goes a long way. she's created a super cute tutorial for today and i'm very excited to turn over the time to tiffany!


I am so excited and honored to be on V&Co. and share with you my retro ruffle dress tutorial. I'm Tiffany from Simply Modern Mom, a site dedicated to simplifying the lives of modern moms. And along the way, I share my sewing, house decorating and crafting tutorials and projects. Then every Tuesday I have a linky party for Project 52: Date Nights where I challenge myself and everyone else to date their spouse once a week for a whole year. So come on over and visit with me. You'll have a blast.

I was rummaging through the thrift store a couple weeks ago and I found a large blue pillowcase for $1.91, but then I had a 50 percent off coupon. I thought it would make a cute blue dress for Elle.

I have this thing for blue dresses for little girls. I love blue on girls. I've had this ruffle dress sketched in my notebook for a while now. I thought the pillowcase would be perfect for it. If it didn't work out I've only lost $0.96.

I wanted to make a pillowcase dress for Elle that didn't make her look like she is actually wearing a pillowcase. Also, since I'm using a pillowcase, the dress will only fit a baby. Elle is 14 months and wears between 12-month and 18-month size clothes. You probably don't want to make this for a toddler bigger than 18-month size. And another note, I made the collar on this dress little too big. Next time, I would cut the hole slightly smaller.


Supplies:

  • a large pillowcase (40 x 20 inches) or same amount of fabric (40 x 40 inches)
  • matching thread
  • 2 inch matching ribbon
  • a button

1. Flip the pillowcase inside out and lay flat. Then place a dress that is the size and fit you like for measurements. Using a washable fabric marker I marked the collar, armpits and the length of the dress.

2. Add seam allowance to the markings on your pillowcase. I used 1/2 inch seam allowance everywhere unless noted otherwise in later instructions. The bottom of the dress I added 2 inches for the seam and the hem. I matched the shoulder of the pattern to the top of the pillowcase so I didn't have to sew that part. Once you marked your measurements, fold the pillowcase in half long ways then cut. I do this so the left side of the dress will be exact with the right side. Keep all your scrap pieces because you'll use them.

Tip: Make the collar a little straight at the bottom instead of rounded because you'll have the ruffles there.

3. Cut strips for the other parts of the dress using remaining pillowcase. Large strip that goes down the middle of the dress is 3 1/2 x 20 inch. The ruffles are 4 x 40 inch strips, you'll need 2. The collar is 2 x 30 inch, this only has a 1/4 inch seam allowance. The V-split on the back of the dress is 1 1/2 x 6 inch, this also has a 1/4 inch seam allowance.

Tip: Use tape to mark each strip so you don't get them mixed up.

4. Using scraps cut the sleeves. You'll need 4 pieces of 3 x 10 inch in the shape pictured below.

5. Flip the dress right side out. On the back side of the dress, find the middle of the collar and cut a 3 inch slit. This is for the V-split (I don't know what the technical term for it is, so correct me if I'm wrong) closure on the back of the dress. Be careful not to cut the front of the dress too.

6. Take the V-split strip (1 1/2 x 6 inch) and iron the 2 long sides with 1/4 inch seam into the wrong side of the fabric. Then fold in half and iron so you now have a 1/2 x 6 inch strip. Then pin it to the slit you just cut. The bottom of the V will have a fold. Make sure that's on the inside of the dress. Sew strip in place (see tip below) as close to the edge as you can.

Tip: The best way to pin is to open the V wide so it's a straight line. Pin then allow it to naturally fold back to a V. Same thing with sewing it.

7. With the dress inside out, match the two sides of the V-split so the strip you just sewed on is in half and flat. Then sew the bottom of the V at a 45 degree angle.

8. Moving to the front of the dress now. Iron the ruffle pieces in half the long way right side out. With the short ends of the ruffle pieces temporarily turned inside out, sew the two short ends. Iron them flat right side out again. Next, do a basting stitch down the open side at 1/4 inch seam with the right side out.

9. Iron the 1/2 inch seam on both sides of the large middle piece then place down the middle of the dress. Pin it in place with the dress right side out, front side up. Scrunch the ruffle pieces and pin one side in place. Account or the 3/4 inch collar that will be at the top and the 2 inches at the bottom of the dress for the seam and hem. Sew a straight line from the top of dress all the way to the bottom to keep the strip and the ruffles in place. Then do the same to the second side. Trim off the excess at the top and the bottom from the large middle strip.

10. Take the collar strip and iron 1/4 inch seam into the wrong side of the fabric on both of the long sides. Fold in half long way and iron right side out. At one of the short ends of the collar sew the end close with the wrong sides out. Flip right side out then iron. The collar should now be 3/4 inch wide. Starting from the back of the dress, pin the collar in place using the closed end matching one of the V-split ends.

11. The collar piece should be longer than the collar on the dress. On the opened end of the collar strip, measure the end of the collar and add 1/4 inch for seam then trim off excess. Flip the opened end inside out and place the ribbon on the inside, touching the right side of the fabric. Make sure the ends of the ribbon matches the end of the open ended collar so it will be sewn in place with the seam. Sew the seam, flip right side out and iron. Sew the collar in place all the way around as close to the edge as you can.

12. The sleeves. Match two pieces right sides together. Sew only the curved side at 1/4 inch seam. Flip right side out and iron. Do to both sleeves. Then pin the sleeves to the arms on the dress (see picture below). Sew the sleeves in place then use a serger or zig zag stitch the seam of the sleeve. Iron flat.

13. Flip the dress inside out and pin the sides of the dress. Sew at 1/2 inch seam then use a serger or zig zag stitch to go over the seam.

14. Fold the bottom of the dress at 1/2 inch then iron all the way around on the wrong side of the dress. Then fold again so the hem matching the front ruffles. Iron the hem then sew it all the way around.

15. Sew button on the back and you're done!


tiffany i love the blue dress. and you know me and ruffles. i have a thing for them. thank you so much for your time in creating this lovely little dress elle is gorgeous in it!

make sure you check out tiffany's blog where she gives you hints on how to decorate your home, date your husband and take time for yourself. simply good stuff.

Monday, April 26, 2010

tutorial: fabric flower ring

here's the post i was too sick to do last week. i'm feeling better. thank you for your kind words. and no i didn't burn the toast on purpose, that actually happened (a few days earlier...i just thought it was funny and so i took a picture.) who knew that it was a perfect picture for how i would feel a few days later. but yes, a little better on the sickness...not all better. but good enough. ;) hope your weekend was nice a lovely.
okay...now onto our regularly scheduled post:
here's a perfect ring to give to a friend, mother, daughter, wife, or yourself.
with a few and easy steps you can make this lovely little (okay kinda big) fabric flower ring for whoever you chose!

supplies:
*one strip of fabric measuring at 1 inch by 10 inches.
*one adjustable ring blank
*hot glue

i have kits for this ring in my shop yes that's right i'm making the move to big cartel.
paypal friendly, codes allowed for discounts, not nickle and diming me to death all made it easier for me to make the move. yes you will see my newer designs in my bc shop. i'll keep my etsy open...but assuming all goes well sooner than later all will be moved and only operating through V and Co. the shop .
the kits come in three colors for now but if you are interested in another color just contact me either through email or through my "contact" in my shop and we'll see what i can do for you!
each kit comes with enough fabric and a ring blank. okay i digress.

ready to get started? here we go:

first you will need to get your fabric cut to 1 inch by 10 inches. (it doesn't have to be perfect we're going for wonky)
dab a little bit of hot glue at the end of your strip and fold in half. secure.
dab another bit of hot glue and fold in half

dab a little bit of hot glue to the end again...

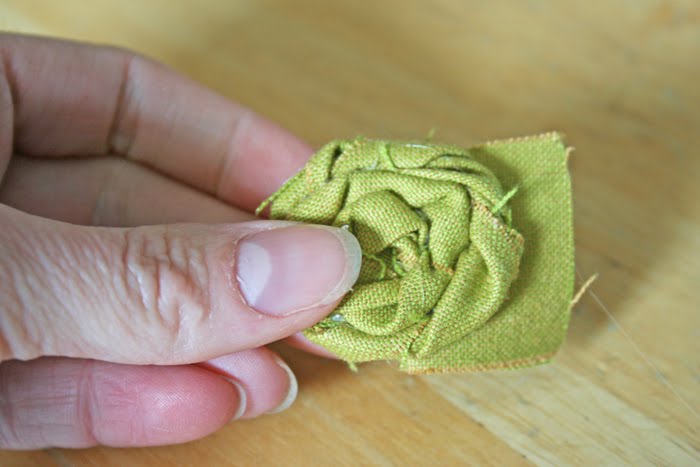
this time you are going to fold over like the picture above. (fold down instead of in half again)
now you are going to twist your fabric a little
and dab a little bit of hot glue to the "base"
i like to make sure my fabric is twirled a little on the tighter side(but not too tight!). this will make your flower smaller and tighter.
continue to twist and twirl your fabric all the while adding a dab of hot glue to secure your new twist to the last twist.

when you get your flower as big as you want it (making sure you leave a little bit of a tail)
add some hot glue to the bottom of your flower and fold and secure your tail at the bottom of your flower flat.
next cut off the extra tail that shows.
next you will get your adjustable ring blank
place a dab of hot glue on to it and
secure your ring. let cool.
what i love about these rings is that they are adjustable and comfortable so no matter how big or small your fingers are the ring base will work for you!
now get ready to wear your new ring!

buy your kit here.
thanks for your support.
this week we have another guest blogger. (oh just wait what she has to show you!)
and i'll have another tutorial by me for the woman in your life having a brand new little one!
we'll talk soon!
;)
comments closed

Thursday, April 22, 2010

burnt toast kind of day


we interrupt the regularly scheduled blog post due to technical difficulties (also known as a lamo sinus infection type thing and a cough that kept her up all freakin' night long).
please enjoy the elevator music till we can return health to the woman behind the blog.
hopefully we'll talk tomorrow.
>:P

Wednesday, April 21, 2010

guest blogger tutorial: cheri of i am momma

first off i am so beyond amazed at your answers from yesterday's post. thank you for your honesty and thank you for kind words on mine!
second,i am beyond tickled to introduce my guest blogger of the day. ever heard of the blog i am momma hear me roar? cheri is cute, cheri is nice...but cheri most definitely is making herself known as someone who can hold her own in the crafting blogworld. she's got some of the ca-utest little boys she calls her sons, and she's got ca-utely awesome ideas to go along with these little boys. cheri was just recently featured on the ever so awesome and super cool site OHDEEDOH you can read more about her cute self there. so enough of my rambling...here's cheri!


Hello V and Co fans! I am thrilled to be here today. I love this blog!!! I am Cheri of I Am Momma - Hear Me Roar. I am the mother of two boys, so naturally I make a lot of boy-oriented stuff. Today we're going to be making this manly tee.


You'll need a blank t-shirt, a clorox bleach pen, some scrap fabric, and some coordinating embroidery floss. Here we go!


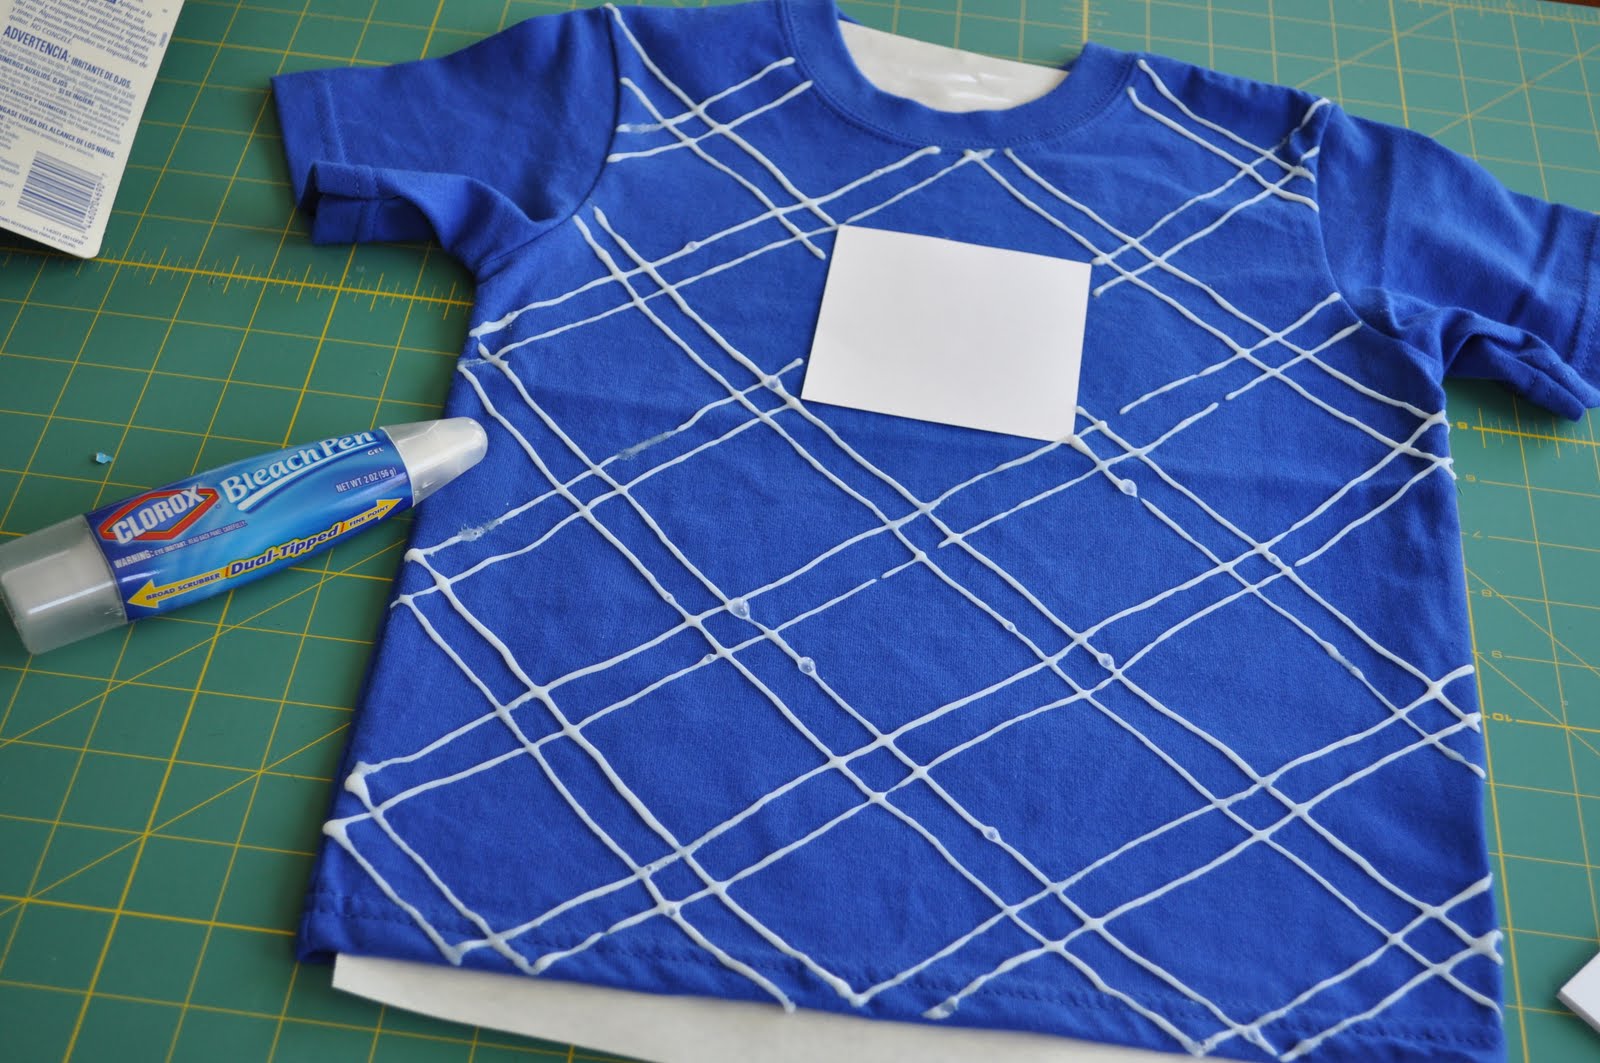
1) Lay out your t-shirt. Place thick paper between the layers of the shirt, so the bleach won't bleed through. I put a small square-shaped piece of paper in the center, to make sure I left some open space for the main design. It's just sitting there - not attached.

2) Draw your plaid lines with a bleach pen and wait until it's the color you want it to be. Before you go crazy with your bleach pen, you might want to watch THIS TUTORIAL for all the info you need to know. Rinse the shirt in the sink to remove the bleach and then throw it into the laundry. Eat some chocolate and surf the net while you're waiting. (I recommend a Skor bar and some good 'ol craft blogs.)


3) Create your design for the middle. I wanted to do an "H" like the Hurley one since that's what our last name starts with. (That way the shirt can be handed down, too. It's not just for one kid.) I always use heat 'n bond when applying a knit fabric to a knit fabric. Iron the heat 'n bond onto the scrap fabric. Draw and cut out the shape. Iron it onto the shirt. I also stitched around it on my machine.


4) Don't forget to floss! Embroidery floss is one of my favorite embellishments for boys' clothing. I hand stitched between the bleach lines to add more interest. I did every other line and used green floss to match the "H" (though it doesn't look super green in this picture).


5) Bribe your child with ridiculous amounts of candy so that he'll let you take his picture.


That's it! Feel free to e-mail me with any questions (but watch the bleach pen tutorial first). Come stop over at my place anytime. Thanks so much for having me! - Cheri

cheri thanks so much for the tutorial! i've got a few ideas rolling around in my head with this!

make sure you pay a visit to her wonderful blog! oh and check out her headbands. to.die.for.

we'll talk soon!
;)

Tuesday, April 20, 2010

what a mother wants...


being a mom takes a lot of time, energy, patience, sacrifice and prayer.

bottom line, it's the most taxing job i've ever had.
but i would never exchange it for anything.
recently i got an email from my awesome friend who i put up on a pedestal on being a funny, creative, and loving mom (hi brooke!) asking me the question: "what do mother's want?" my first thought was "a massage...sleep...quiet time every day." i wanted to write back a witty response to make her smile or even laugh...but decided to walk away from the computer, and sit and stew on this one.

"what do i want?"

i took two full days to sit and think, and stare at my kids.
for the first time in a long time i sat quietly
and stared.
at them.
thinking.

"what, as a mother, do i want?"

here's a little of what i came up with:

i want my kids to be safe, happy, healthy, successful in whatever they chose to be. i want my kids to be able to handle their trials and learn from them. i want my kids to have healthy relationships, i want my kids to think i'm the coolest person alive, i want my kids to learn to work hard, and enjoy the fruits of their labor. i want them to think about their future at a young age, i want my kids to be smart with their money, their education, their investments. i want them to hold tight to what we try to teach them, that God is good. i want my kids to stay close to the church. i want my kids to have faith that good can prevail. i want my kids to be able to stand firm in the storm of wickedness that this world is offering. i want them to be smarter than the average American thought of "you need this now, and you can pay for it later." i want my kids to be safe from porn, i want my kids to be safe from an abusive relationship, i want my kids to have great friends. i want my kids to not be bullied, i want my kids to value school, i want my kids to want to be good. i want my kids to want to stay morally clean. i want my daughter to be a mother, i want my boys to be loving and hard working fathers. i want my kids to always want to be sort of close but not too close so they have healthy relationships with their spouses and their family as an entity. i want them to be able to fix their own problems because of what i taught them. i want them to not do drugs, i want them to not drink, i want my kids to be best friends, i want them to be goody two shoes till their wedding night. i want my kids to basically be in a bubble that will protect them from anything harmful, anything wrong, and anything that will bring them pain.

as my thoughts swirled into a chaotic mess, and as i started to hyperventilate at the thought that my kids are going to have face so much before they move on from this earth...i stopped. wiped away the tears, i sat and i stared at my beautiful kids that i would lay down my own life for, and the final answer came to me:

"what do i want?"

"i want to be a good mother at every stage of their life. i want to be there for them and to be able to handle the choices (good and bad) they make with grace, humility, and love. i want to always be able to love them, and forgive them, and to always have open arms when they need me. i want them to know how much i rely on the Lord. i hope to be a good example that they would want to do what is right and good not by my words but by my actions."

so scratch all that other stuff. (well not really but you know what i mean)
i just want to be good for them.
that's all that matters.
nothing else can come close to that in my world.
i just hope to be a good one.

and that makes me nervous just the same.

so with that.

"WHAT DO YOU WANT?"
i'd love to hear.

it will make you think long and hard about those little noisemakers that make you so mad at times, in a different light even if for a minute. well, before one of them comes and tells you he just blew out a window in the barn with his brand new BB gun his grandma gave him for his birthday.
here's to grace and love...and counting to 10 before responding.

;)
we'll talk soon.
Blog Widget by LinkWithin