i fell to the peer pressure of emails and comments and actual face to face conversations of "how about ornaments? why haven't you done any ornaments?"
well, i did in fact have one planned before this one, but i felt like a sewing project was in order since i've not really shown you much of that lately. no worries more of it is coming. but for now here's a fabric ornament that will be a great teacher or neighbor gift. or heck, add them to your tree. :)
for one ornament
materials needed:
*1/4 yard fabric
*mason jar (wide mouth) or a cup will work just the same.
*pencil
* ribbon (around 8")
*hot glue gun
lets'g get started:
*fold your fabric in half with right sides facing.
*i used a mason jar (wide) mouth to make my circles. but any mouth of a cup or glass will work.
*place mouth of the jar down on the fabric and with a pencil trace 9 circles
*next you are going to sew right on your drawn lines. all the way around, and back stitch when you get back to where you began on your circle.
*picture 1: cut out all your circles.
*picture 2: pull your circle so you can...
*picture 3: cut open a small slit in the middle of your circle but make sure you only that one side.
*picture 4: turn inside out
* press with an iron.
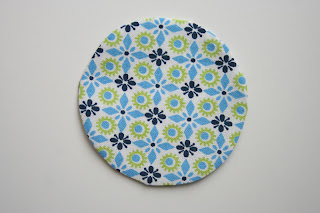
this is what your now pressed circle will look like.
*do the same for all 9 circles.
now lets assemble the ornament:
*grab your ribbon
*place flat onto one circle (cut side up) in the middle making enough of a loop for hanging.
*place hot glue and secure your ribbon
**this is your base point of the ornament.
*next, grab your next circle, with the non cut side facing you, fold in half and place a line of hot glue as close to the folded edge as you can.
*place your curved edges to line up with the outside of your circle, and with the hot glue side down place your folded circle on top of your base circle, and press down in place.
*this is what your ornament should look like when all your circles have been glued on.
okay now to make that honeycomb design:
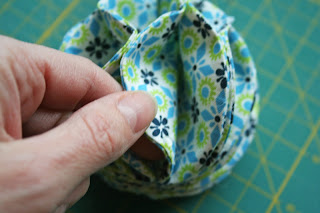
*take EVERY TWO circle flaps of fabric, and place a small dab of hot glue on the inside edge of your flaps in the middle of the ornament facing you:
see how when i pull it apart it is glued in the middle? that's what i mean when i say "the middle".
*now take two of the glued flaps, and take the outside flaps, close to the top, add another small dab of hot glue on the inside edge and press:
you are now starting to get the honeycomb look, continue to do this around the top of the ornament.
*do the same to the bottom part of the ornament, on the same outside flaps as the top ones.
*you now have one completed ornament.
add solid color coordinating ones to the mix and you will have a very pretty set of ornaments.
come back tomorrow (monday) we will be having a fabric bundle giveaway. cause you know you need fabric to give to yourself as a present under that tree!
well, i did in fact have one planned before this one, but i felt like a sewing project was in order since i've not really shown you much of that lately. no worries more of it is coming. but for now here's a fabric ornament that will be a great teacher or neighbor gift. or heck, add them to your tree. :)
for one ornament
materials needed:
*1/4 yard fabric
*mason jar (wide mouth) or a cup will work just the same.
*pencil
* ribbon (around 8")
*hot glue gun
lets'g get started:
*fold your fabric in half with right sides facing.
*i used a mason jar (wide) mouth to make my circles. but any mouth of a cup or glass will work.
*place mouth of the jar down on the fabric and with a pencil trace 9 circles
*next you are going to sew right on your drawn lines. all the way around, and back stitch when you get back to where you began on your circle.
*picture 1: cut out all your circles.
*picture 2: pull your circle so you can...
*picture 3: cut open a small slit in the middle of your circle but make sure you only that one side.
*picture 4: turn inside out
* press with an iron.
this is what your now pressed circle will look like.
*do the same for all 9 circles.
now lets assemble the ornament:
*grab your ribbon
*place flat onto one circle (cut side up) in the middle making enough of a loop for hanging.
*place hot glue and secure your ribbon
**this is your base point of the ornament.
*next, grab your next circle, with the non cut side facing you, fold in half and place a line of hot glue as close to the folded edge as you can.
*place your curved edges to line up with the outside of your circle, and with the hot glue side down place your folded circle on top of your base circle, and press down in place.
*fold your next circle, repeat the above step but this time place it on the other half like the picture above.
*repeat this step for the total of 4 circles on this one side (so 2 & 2)
*now that you have one side done, lets flip over the ornament, and repeat this same process again with the 4 circles.*this is what your ornament should look like when all your circles have been glued on.
okay now to make that honeycomb design:
*take EVERY TWO circle flaps of fabric, and place a small dab of hot glue on the inside edge of your flaps in the middle of the ornament facing you:
see how when i pull it apart it is glued in the middle? that's what i mean when i say "the middle".
*now take two of the glued flaps, and take the outside flaps, close to the top, add another small dab of hot glue on the inside edge and press:
you are now starting to get the honeycomb look, continue to do this around the top of the ornament.
*do the same to the bottom part of the ornament, on the same outside flaps as the top ones.
*you now have one completed ornament.
add solid color coordinating ones to the mix and you will have a very pretty set of ornaments.
come back tomorrow (monday) we will be having a fabric bundle giveaway. cause you know you need fabric to give to yourself as a present under that tree!


32 comments:
Oooh...I like them. I pinned some like this a while ago that were made with felt, but I love it even more made from cotton!
such a cool tut..thanks for showing me the cool ornament...love it..phyllis
Thank you! Cute, fun and easy - my favorite kind of project! Think I'll make some for friends and maybe even myself.
Very pretty.
This is fabulous!! Thanks for the great tutorial!
This is so CUTE! and so do-able at this busy time of year. Thanks so much for this great tutorial!
You are so witty!
adorei, uma ideia para uma árvore muito mais especial :)
convido a passar no meu blog www.njoaninhas.blogspot.com
Bom resto de fim de semana :)
These are lovely! Your tutorial came just in time for my annual ornament exchange party. I might make these for my guest. Thanks so much!
Worth the wait, V. Love it!
Smarty pants ;o)
Oh my goodness! I love this!! :o)
Thanks so much for showing us how.
What a great looking ornament and so different than any others I've seen made from fabric. Great job!
That is so pretty. And it looks simple enough I might actually do it:)
So pretty and so clever! x
great idea. I am going to try to make this for an ornament exchange.
Vanessa, this ornament will be on my tree I'm building for Salt Lake's Festival of Trees next year. I'm so excited!
Love this clever decoration! must make some for my home :)
Thank you :) :)
This is a fabulous ornament. I'm so inspired!
Really very beautiful and easy to make it at home.
Absolutely love them! Will make some for our tree. Thank you for the tutorial!
This was great!!
I posted pictures of the ornament that I made using this tutorial on my blog today.
Thanks for sharing this great idea. I'll be making more!
Brooke
OOPS! Sorry - I was logged in to the wrong blog. I posted my pictures on my quilting blog at www.lazydaisyquilts.blogspot.com.
Sorry about that!
Brooke
Wowwwwwwwww! Super cool!!!!!!!!!!
Thank you! \o/
Congratulations from Brazil! :D
fantastic for a colorful x-mas dekoration. i like it!
I linked to your tutorial on my blog - thanks for sharing!
doro K.
Thanks for such a great tutorial! I made a few for friends already and am planning on making many more!
Great tutorial! I made one too and posted my pictures here:
http://buttercreamsewingmachine.blogspot.com/2011/12/ornament-from-v-co.html
I hope you will take a minute and come check it out. I love how it turned out!
I followed this tutorial and have made some very pretty ones. Thank you so much!
Just found you through Pinterest. This ornament is lovely. I was wondering how the glue held up on year later. Thanks!
Love it!! Great for Gmas that have everything!!
could you sew around these, wrong sides together, then snip and wash for the raggedy look? You would need to press with starch, avoiding the snipped edges of course. Or sew in a firm circle of stabilizer just in the center for stiffness. Hummm I think I will give it a try.
Beautiful and your chosen fabric works for any occasion. Looks so great hanging. Thanks for the tutorial. After so many years it still works great.
Post a Comment