Monday, April 7, 2014

V and Co: how to make: Bias tape with out a bias tape maker and a fabric banner with the slice precut


Well, with warmer weather flirting with us and promising that it's going to come and stay here for longer than just one day with a high of 65 degrees, and with the arrival of color me happy finally making it to stores, here's a fun little project for you to spruce up your outside parties and celebrations. 


I know what you're thinking...uhhh Vanessa, theres like a whole army of tutorials on how to make fabric banners...
YEAH I KNOW PEOPLE, but listen...I'm using a new pre-cut that Moda introduced last fall. It's called the Slice. And there are some great free patterns already out there for these...so I'm adding my little bit of flair to the cause. 

This pre-cut is available in many fabric lines, look for it! Here I'll be using my newest fabric line "Color Me Happy" this particular precut can be found here.

 Okay, ready to get started?
Here's what you'll need:
1 color me happy slice

2 - 4: 2"xWOF strips of fabric. (we are making the bias tape..but not on the bias)
 Depending on how long you want your banner to be will determine the number of strips of fabric you will need. 1 strip will be approx.  44", two 88" and so forth. For this tutorial lets just say 3 strips to make it 132" long (because I wanted to use more of my slice precut!)

Making the Bias Tape:
Okay so first things first, to make the bias tape we will sew end to end your three 2" strips. I wanted the strips to be connected as if they were on the bias so this is how I sewed my strips together:
 With right sides together I placed two strips just as I show in the picture, making sure there is at least 1/4" over lap of each strip.
 Sew diagonally starting where the edges meet at the top (if you need to, draw a line diagonally from one side of where the edges meet to the opposite side of where the edges meet and sew on the drawn line )
Continue to sew all the way to the other side.
Do this again to the next strip to attach.
*tip: Place washi tape to guide you (place the washi tape edge directly down from where needle goes down into the fabric and keep where the fabric edges meet directly on that washi edge like the picture shows)

Next:
Once your strips are all sewn together to make one long strip, we will be folding in the edges to finish up the bias tape.
This way that i'll be showing you might be a little different than you are used to. I learned this method from a seasoned quilter on how to "make do" if you don't have a bias tape maker big enough for what you need:
 there are bias tape makers out there that are big enough for this project, but if you don't have one (like me!) then this will do just fine.
here we show a couple of bias tape makers. both too small for what I need. So I will use an extra long pin as my bias tape maker:
With my ruler and pin in hand, I laid down the ruler on the ironing board and pinned in at the 1 1/4'' mark to the end of the ruler. Creating a gap or 1 1/4"
Next I folded in the edges of the fabric and stuffed no wait gently placed in through the gap.
press this end down with an iron the start of your bias tape.
Gently pull through your strip and watch as the edges fold in.

As you pull through press (if you are right handed like I am I pull the strip towards my left. That way I can pull the strip with my left hand and iron with my right.)

*tip: make sure that your folded edges stay even, just check them and re-adjust if you need to. 

Making the Pendants:
 Open  your Slice precut of Color Me Happy.
There's no cutting involved, that's what makes this so great!
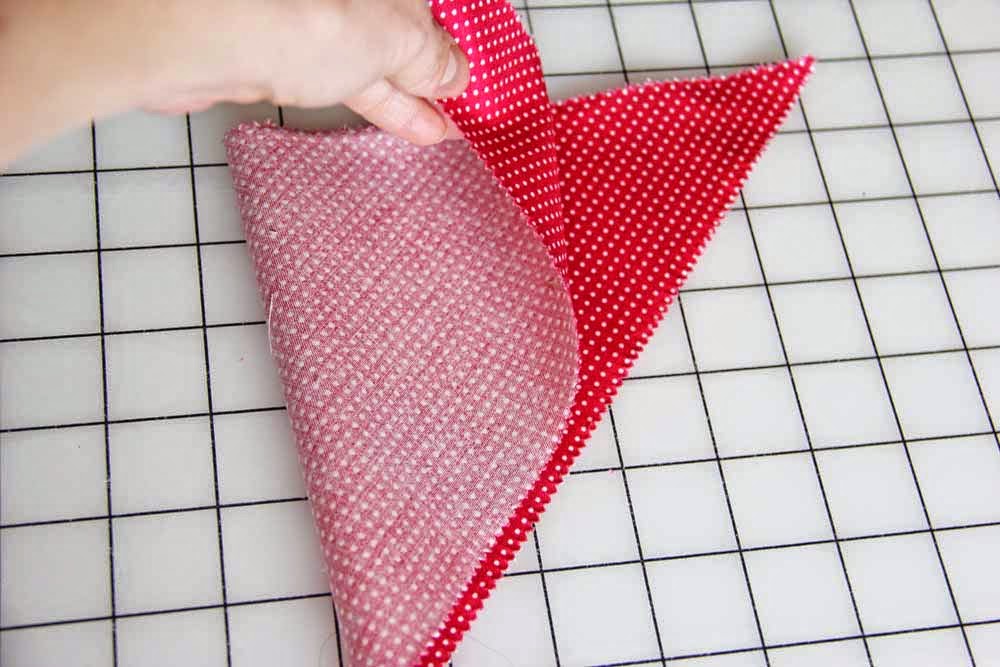
 Fold in half with right sides together
 We will be sewing the one short side and leaving the long side open.
 Using a 1/4" seam sew the short side, starting and finishing with a back stitch.
 Turn inside out and press with an iron.
The open side will be nestled into your bias tape so that doesn't need to be sewn.
Fold in 1/4" in one end of your bias tape to make a finished edge, then fold back down and top stitch for about 12" without placing a pendant. 
after the 12" place your first pendant nestled in between your folded bias tape. Sew with a top stitch across the bias tape with the pendant in it. Continue until you have around 12" left of your bias tape left. Finish by top stitching and then folding in the edge 1/4" for a finished edge.

Banner done!
Now here's hoping for some even nicer than 50 degrees weather on a consistent time frame!
we'll talk soon!
follow V and Co on Instagram and Facebook

Thursday, April 3, 2014

V and Co: I love a challenge wrap up

Well, I'm way late into the game of things...I'm running around 2 months behind on life so naturally I'm going to blog about this fun little challenge...you guessed it 2 months later than the rest of the girls.

Remember last november when I did my fall market wrap up? Yeah if you scroll down to the bottom you see that there was this fun group of ladies that "found each other" in front of my booth. They were having a grand 'ol time laughing and talking and just being down right happy. So I grabbed 6 little mini charm packs of color me happy and gave it to them.
They all said "thank you" (their mothers should be pleased) and then they continued to talk and conspire as to what they would do with their new little mini charm pack...and that's when they all decided to do something and link back to each other.
It was pretty fun to watch them!

And well here's what they came up with:

Tammy - An adorable pillow version of her I {heart} Floressence Quilt

Becca - A cute Dresden Pin Cushion

Julie - "Looking Up" Mini Quilt, I love arrows!


And look what I found while perusing Julie's blog!  A bonus Quilt by Ruth from Pippin Sequim called Snowflake. It's super cool!


Brooke - Made a fun Color Me Centerpiece

Joanna - Made a fun wall hanging inspired by our market photo (see us all there embraced in the middle!)

Sally - And lastly Sally made the "We're Better Together Quilt" I'm loving the mustachioed monster 
So ladies like I said at market, and like I said at the beginning of this post...it was fun watching you guys get to know each other and share this fun project with me. I love what I do and you guys made it even better. Thanks for the fun. :) 
We'll talk soon

follow V and Co on Instagram and on Facebook! 

Friday, March 28, 2014

V and Co: Other options for Handmade

 So now that Color Me Happy is in stores, so are my newest patterns. :)
YAY!
If your shop carries Color Me Happy then YAY!
If they don't then you might find yourself thinking...
"I want to make that Handmade pattern...but my shop doesn't have the Ombre stripe from the Color Me Happy line." You might also be thinking "Should I just eat the chocolate chips straight out of the bag?  Hmmm what does the fox really say? What is the true meaning of life?"
And while I can't really help you out with those other thoughts (except for the chocolate chips one: totally eat them out of the bag, you're the adult you can make the rule in the house.) 
I can help you out with what do I do if I can't get a hold of the Ombre Stripe from Color Me Happy.


 Option 1:

3 1/2 yards Simply Style Aquatic Blue Ombre Gradient Fabric

and 1/2 yard of emerald green for the knobs

 Option 2:
bella solids that match the color ways of my ombre stripe.
1 1/4 yard: ruby ice 9900 169
1 1/4 yard: aqua 9900 34
1 1/4 yard: peacock 9900 216
and for the knobs
1/2 yard: emerald 9900 268
and well then theres totally the easiest option:
Option 3:

buy the Fat Quarter Shop's kit for the pattern (includes the pattern) 

:) There. So have fun. And can't wait to see your sewing machines!!! :)
Talk to you soon!
Follow V and Co on instagram and Facebook! 

Wednesday, March 19, 2014

V and Co: Color Me Happy is NOW IN STORES


 Color Me Happy is now in stores. I'm Very VERY excited as this is my FAVORITE. No really hands down...fave. :)
I just had to pop in here to say that it's now shipped to stores and to please start using it for projects and upload it to my V and Co. flicker group or #colormehappyfabric it on instagram because I want to see what you are doing with it! :)
I promise to pop back in here to do that tutorial I've been promising...but we're on spring break and well...no time. :)
When I get back I swear I'll blog. :)

but for now:
follow V and Co. on Instagram and Facebook 

Friday, March 14, 2014

V and Co: honorable Jake

Hello! And welcome to my Blog! If you are new here visiting for the first time from the Jolly Jabber allow me to introduce myself. Hi, I'm Vanessa of V and Co. I'm a Fabric and Pattern designer For Moda Fabrics and I get to be part of the Designer Mystery block of the month that that Fat Quarter Shop is hosting this year.
I was pretty excited that it was centered around stars...as I have a thing for them...they are my favorite quilt blocks.
Along with designing a block I got to name it and the stipulations given to us was to name it after a star we look up to in our lives.
Immediately, my husband came to mind.


My husband is a good man. Actually, he's more than that. He's my rock, he's my vote of confidence, he's my love, and he makes me want to be a better person.
 Together we've had 4 amazing kids.

We are partners in everything. We parent as partners, we do our finances as partners, we set family goals as partners, we struggle for each other, we feel happiness for each other, we meet each other half way most of the times. But there are times when he meets me more than half way...


He's the kind of man, that works so hard for our family, not just financially, but emotionally, and spiritually. I see him on his knees in prayer every night, I see him so tired, but getting up before the sun is up to do his jobs, I see him giving our sons and daughter a wonderful example of what a man should be to his wife and to his children. He loves me unconditionally, even with my faults, he supports me, even when I am doubting myself, he motivates me to try harder and to reach for new heights, he inspires me to be better. 

He's the best thing that has happened to me. He's an honorable man, and that's why I named my star after him.

Thank you Fat Quarter Shop for letting me be part of this! If you head back to the Jolly Jabber and comment on their post you will be entered to win a $75 certificate, just mention my star's name and who you find to be a star in your life for that chance!
Also head over to Kate Spain's and Minick and Simpson's blogs to find out who's a star in their lives.

We'll talk soon! Have a great weekend!
On monday I have a fun pre cut how to! See you then

follow V and Co. on instagram and Facebook 
Blog Widget by LinkWithin