Wednesday, April 30, 2014

Summer 2014 Quilts And More and other pretty summer colors

used with permission from Quilts and More magazine. 2014 Meredith Corporation. All rights reserved

 If you haven't already checked it out, check it out now, the new Quilts N More has hit stands and my Ombre stripe bags are in there with instructions. It's a super easy tote bag perfect for your summer needs. In 5 summery colors even! :) I'm always excited when I get to contribute to this magazine. And what a wonderful issue to be able to contribute to: SUMMER!
Because let me tell you something. I need summer weather to get here. Its been rather gloomy/rainy/thunderstormy here with a few tornado warnings.
I don't think I'll ever get used to that. But I've learned that 72 hour kits are super important and using any phrase with the word "sump pump" is normal. Had no idea what a sump pump was till we started looking at houses here…and now I know they are crucial, and even back up sump pumps are strongly suggested.
Also after almost three years here…and being this close to Minnesota and Wisconsin, I can still say I hear the accent…but it doesn't sound completely foreign to me…and I know when people ask for a "BEG" they are saying "BAG" with the accent. I don't double take anymore and that sort of worries me…or it just means I'm assimilating to the northernish midwest…and that's not necessarily a bad thing.
The weather here though…is something else. No, seriously…it can be something completely different from what you just had 5 minutes ago. Yep. Wacky weather.
This picture taken in my sewing space while uber gloomy and stormy…is of my enlarged version of my lucky star quilt.
Just like my lucky star Christmas pillow I made…this is just one block made large to finish at 48" square. Another perfect baby quilt. :) This is the workshop I'll be teaching at the Modern Quilt Guild in Kansas City this July. I'm very excited to go and teach this as it's super fast and fun. I'm thinking of making one in each of the 5 ombre stripe colors…but first I have to finish a couple of large deadlines that have been piling up on me and I seem to keep making small headway on them...


Conditions around here haven't changed…the cat overlord seems to be getting smarter than the average cat and is dismissing my decoy fabric I put down, or sometimes it's a race and she is obviously winning because she gets to my project before I can get the decoy fabric down…and then she KNOWS its decoy fabric and the whole mission of not having her butt on my project by putting out decoy fabric is ruined. Just have to be smarter than the cat V… just have to be smarter than the cat...
I at least am grateful to be working on a very fun yellow project, that is helping with the gloom skies and the fact that I will never win against that cat.

She has been added to the hashtag of #catsthatsew on Instagram
I also have buck the dog…but he's less in my space…he still hangs out in the daughter's room while she's gone till she comes home. As much as my husband would like to say that that dog is the family dog or his dog…that animal sure spends a lot of time waiting till the little half pint girl gets home, or loves all the attention the little half pint girl gives him while playing dolls on him or watching movies with him and putting bows on his ears…I'm pretty sure she's always going to be a dog person. 
Okay enough rambling…off to finish something…anything! :) 
We'll talk soon.
follow V and Co. on Facebook and Instagram

Monday, April 14, 2014

Where I've been

Truth be told the blog is still very quiet.
Truth be told...I've been very busy. I've gone places, to teach, to volunteer, and to talk.

On a side note: A lot of you know that I'm Mormon, and go to the Church of Jesus Christ of Latter Day Saints. A lot of you are too...so you totally get that not only am I mom, pattern creator, fabric designer...I'm also a Primary President. :) It's a wonderful calling. Time consuming? Yes. Almost like a job? YES. Some of you who don't know what that means...it means that I volunteer my time to church service without pay and my "calling" is my job. A Primary President is over all of the little children ages 18 months to 11 years of age, and their sunday school programs, and our Boy Scouts and our version of Girl Scouts (Faith In God) programs. It's a lot of work...but if I were to pick a job (which I don't but if I did) I would pick Primary. The children are my people. They get me, they like my silly faces, and they are just plain awesome. Kids are cool.
So when I'm not doing all the other things I do...I'm doing that as well. Which adds more to my load but I happily do it.

These last few weeks I've had the opportunity to travel within my now home state of Iowa to hang out on set of the PBS show Fon's and Porters Love of Quilting.

 There I got to show Mary Fons how to make my kaleidoscope block large sized, all ran smoothly...but there is something I realized right there and then in-between episodes while someone took pictures of me and Mary:

We have an AMAZING talent of making awesome faces.
I cannot lie...I have NO IDEA what I was doing or saying. I know what it looks like I'm doing...
It looks like I am trying not to blow chunks. But I can honestly say that I had a blast, it went smoothly, and Mary makes being on camera EASY.
I did manage to keep my arms more by my sides than say in this picture:
HEY I'm wearing the same shirt...
MAYBE THE SHIRT IS THE PROBLEM!
whatever the case...
 Mary's a wonderful individual and "working" with her didn't feel like working, it was great to get to know her a little better, and I'm SUPER excited to get to be at the Shipshewana Quilt Festival in June together as well. Stay tuned fore more fabulous faces from both of us...I'm sure.

 During my time at Love of Quilting I got to watch one of the QUEENS of quilting Liz Porter of Fons and Porters, while she taped a future episode for the show.
I totally played my cool and didn't like geek out on her or anything...till Lunch when she personally asked me a question...and my mind went blank. Was it a hard question? Nope, just "So what are you going to do today?" I couldn't even remember the project I had brought to do with Mary for the website. I stared at her like a deer in headlights. I finally came to, and told her...
 Afterwards a couple of the other of the show's guests asked to take a picture with her...I jumped in and got one too. :)

Also these last few weeks I've taught classes:
A couple of classes at my local quilt store Pineneedles Sewing Center. What a fun time that was! The ladies were so fun, and we laughed a little too much...but we were productive! We had two full days of sewing, creating quilt blocks and playing with texture. I am super lucky to personally know Jill, who is the owner and a fantastic individual (and so FULL of knowledge) and to have a great quilt store close by. Super lucky indeed.
 Another close-ish store to me is the WONDERFUL cute little fabric/yarn store in Iowa City called Home Ec. Hands down Cody (owner) is one of the kindest, sweetest, friends I have gotten to know here in Iowa. She's so genuine and I Love LOVE teaching classes there. Not only do I have a wonderful really close to me local quilt store...I have a second one just a hope skip and jump away (on the highway) :)
I'm feeling very blessed to have these two stores, and my time with Mary.

Of course I feel bad that it takes me so long to talk about these things here on the blog...but if you come check me out on instagram:
http://instagram.com/vchristenson
 You get to see a little more behind the every day scenes...and whereabouts.
Now if you don't mind me...I need a cookie. Because I am still need to finish things for places I will be, and for other things I've said I would do. :) One must keep ones strength up and Chocolate Chip cookies are the best way to do so.
We'll talk soon.
follow V and Co. on Instagram and Facbook 

Monday, April 7, 2014

V and Co: how to make: Bias tape with out a bias tape maker and a fabric banner with the slice precut


Well, with warmer weather flirting with us and promising that it's going to come and stay here for longer than just one day with a high of 65 degrees, and with the arrival of color me happy finally making it to stores, here's a fun little project for you to spruce up your outside parties and celebrations. 


I know what you're thinking...uhhh Vanessa, theres like a whole army of tutorials on how to make fabric banners...
YEAH I KNOW PEOPLE, but listen...I'm using a new pre-cut that Moda introduced last fall. It's called the Slice. And there are some great free patterns already out there for these...so I'm adding my little bit of flair to the cause. 

This pre-cut is available in many fabric lines, look for it! Here I'll be using my newest fabric line "Color Me Happy" this particular precut can be found here.

 Okay, ready to get started?
Here's what you'll need:
1 color me happy slice

2 - 4: 2"xWOF strips of fabric. (we are making the bias tape..but not on the bias)
 Depending on how long you want your banner to be will determine the number of strips of fabric you will need. 1 strip will be approx.  44", two 88" and so forth. For this tutorial lets just say 3 strips to make it 132" long (because I wanted to use more of my slice precut!)

Making the Bias Tape:
Okay so first things first, to make the bias tape we will sew end to end your three 2" strips. I wanted the strips to be connected as if they were on the bias so this is how I sewed my strips together:
 With right sides together I placed two strips just as I show in the picture, making sure there is at least 1/4" over lap of each strip.
 Sew diagonally starting where the edges meet at the top (if you need to, draw a line diagonally from one side of where the edges meet to the opposite side of where the edges meet and sew on the drawn line )
Continue to sew all the way to the other side.
Do this again to the next strip to attach.
*tip: Place washi tape to guide you (place the washi tape edge directly down from where needle goes down into the fabric and keep where the fabric edges meet directly on that washi edge like the picture shows)

Next:
Once your strips are all sewn together to make one long strip, we will be folding in the edges to finish up the bias tape.
This way that i'll be showing you might be a little different than you are used to. I learned this method from a seasoned quilter on how to "make do" if you don't have a bias tape maker big enough for what you need:
 there are bias tape makers out there that are big enough for this project, but if you don't have one (like me!) then this will do just fine.
here we show a couple of bias tape makers. both too small for what I need. So I will use an extra long pin as my bias tape maker:
With my ruler and pin in hand, I laid down the ruler on the ironing board and pinned in at the 1 1/4'' mark to the end of the ruler. Creating a gap or 1 1/4"
Next I folded in the edges of the fabric and stuffed no wait gently placed in through the gap.
press this end down with an iron the start of your bias tape.
Gently pull through your strip and watch as the edges fold in.

As you pull through press (if you are right handed like I am I pull the strip towards my left. That way I can pull the strip with my left hand and iron with my right.)

*tip: make sure that your folded edges stay even, just check them and re-adjust if you need to. 

Making the Pendants:
 Open  your Slice precut of Color Me Happy.
There's no cutting involved, that's what makes this so great!
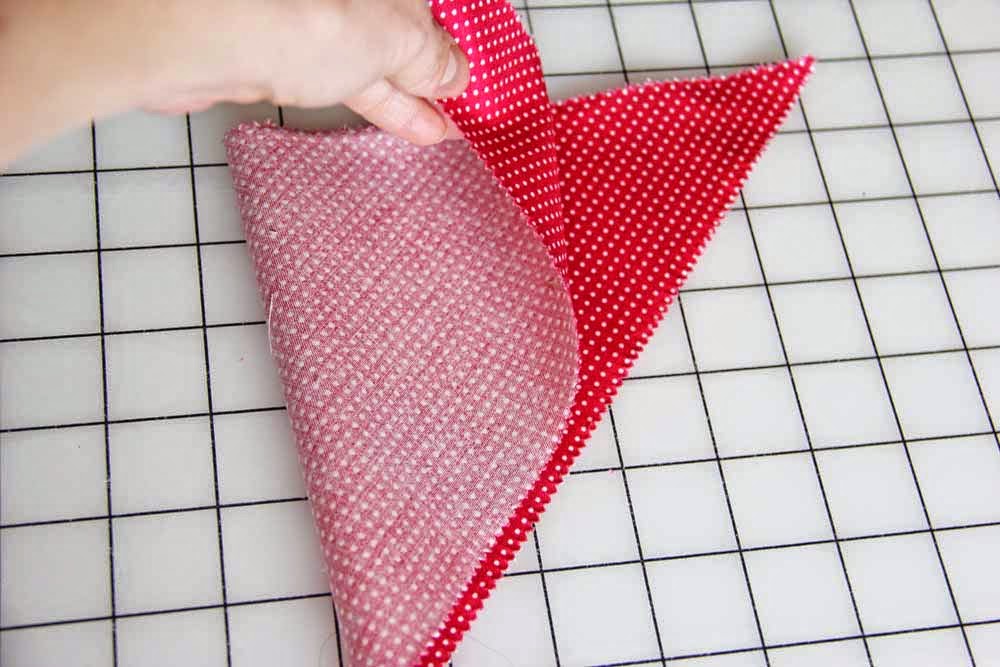
 Fold in half with right sides together
 We will be sewing the one short side and leaving the long side open.
 Using a 1/4" seam sew the short side, starting and finishing with a back stitch.
 Turn inside out and press with an iron.
The open side will be nestled into your bias tape so that doesn't need to be sewn.
Fold in 1/4" in one end of your bias tape to make a finished edge, then fold back down and top stitch for about 12" without placing a pendant. 
after the 12" place your first pendant nestled in between your folded bias tape. Sew with a top stitch across the bias tape with the pendant in it. Continue until you have around 12" left of your bias tape left. Finish by top stitching and then folding in the edge 1/4" for a finished edge.

Banner done!
Now here's hoping for some even nicer than 50 degrees weather on a consistent time frame!
we'll talk soon!
follow V and Co on Instagram and Facebook

Thursday, April 3, 2014

V and Co: I love a challenge wrap up

Well, I'm way late into the game of things...I'm running around 2 months behind on life so naturally I'm going to blog about this fun little challenge...you guessed it 2 months later than the rest of the girls.

Remember last november when I did my fall market wrap up? Yeah if you scroll down to the bottom you see that there was this fun group of ladies that "found each other" in front of my booth. They were having a grand 'ol time laughing and talking and just being down right happy. So I grabbed 6 little mini charm packs of color me happy and gave it to them.
They all said "thank you" (their mothers should be pleased) and then they continued to talk and conspire as to what they would do with their new little mini charm pack...and that's when they all decided to do something and link back to each other.
It was pretty fun to watch them!

And well here's what they came up with:

Tammy - An adorable pillow version of her I {heart} Floressence Quilt

Becca - A cute Dresden Pin Cushion

Julie - "Looking Up" Mini Quilt, I love arrows!


And look what I found while perusing Julie's blog!  A bonus Quilt by Ruth from Pippin Sequim called Snowflake. It's super cool!


Brooke - Made a fun Color Me Centerpiece

Joanna - Made a fun wall hanging inspired by our market photo (see us all there embraced in the middle!)

Sally - And lastly Sally made the "We're Better Together Quilt" I'm loving the mustachioed monster 
So ladies like I said at market, and like I said at the beginning of this post...it was fun watching you guys get to know each other and share this fun project with me. I love what I do and you guys made it even better. Thanks for the fun. :) 
We'll talk soon

follow V and Co on Instagram and on Facebook! 
Blog Widget by LinkWithin